一、概述 集群的搭建可以分为以节点准备、节点握手、分配槽三个步骤。
节点准备 Redis集群一般由多个节点组成,节点数量至少为6个才能保证组成完整高可用的集群。每个节点需要开启配置 cluster-enabled yes,让 Redis 运行在集群模式下。建议为集群内所有节点统一目录,一般划分三个目录:conf、data、log,分别存放配置、数据和日志相关文件。把6个节点配置统一放在conf目录下。
节点握手 节点握手是指一批运行在集群模式下的节点通过 Gossip 协议彼此通信,达到感知对方的过程。
1 127.0.0.1:6379> cluster meet 127.0.0.1 6381
分配槽 Redis集群把所有的数据映射到16384个槽中。每个 key 会映射为一个固定的槽,只有当节点分配了槽,才能响应和这些槽关联的键命令。
1 redis-cli -h 127.0.0.1 -p 6379 cluster addslots {0...5641}
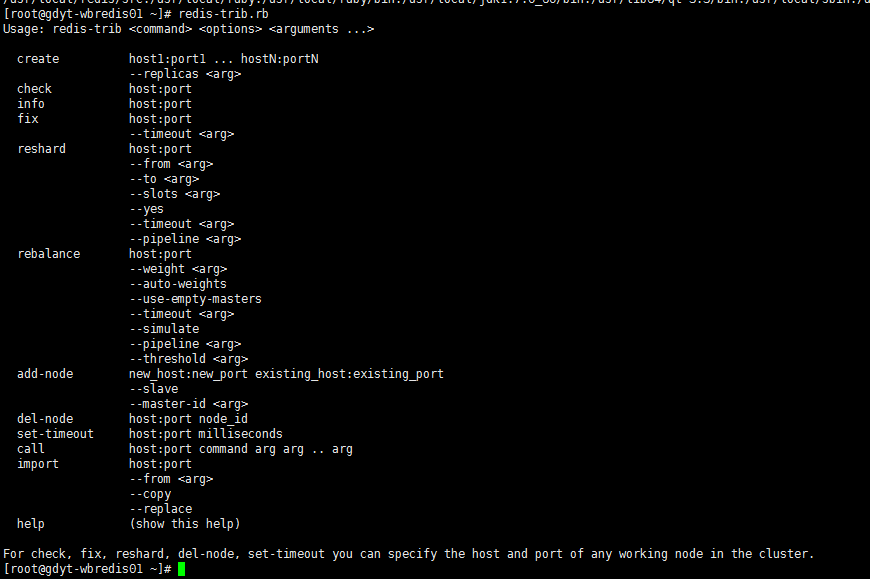
二、用 redis-trib.rb 搭建集群 虽然手动搭建集群可以让我们了解集群建立的流程和细节,单当节点多时,手动搭建比较繁琐,并且容易出错,所以生产环境推荐使用 redis-trib.rb 集群管理工具进行搭建。 redis-trib.rb 提供了集群的创建、检查、修复、均衡等命令行工具,输入 redis-trib.rb 命令可以查看到具体的参数用法。
这里用3台机器,每个机器上安装4个节点,总共12个节点,按1主1从组成集群。
服务器
节点实例端口
10.2.8.94
7000,7001,7002,7003
10.2.8.95
7004,7005,7006,7007
10.2.8.96
7008,7009,7010,7011
准备节点
下面以一台服务器为例,安装4个节点,其余2台机器也采用同样的方式进行安装。
安装目录 关闭防火墙 1 2 #service iptables stop #关闭防火墙 #service iptables status #查看状态
安装Redis 1 2 3 4 5 6 7 8 9 # cd /usr/local/ # wget http://download.redis.io/releases/redis-3.2.3.tar.gz #下载安装包 # tar -xf redis-3.2.3.tar.gz #解压安装包 # ln -s redis-3.2.3 redis #建立软链接,方便以后升级维护 # cd redis # make && make install # cd src # ./redis-cli -v #验证安装是否成功 # export "PATH=/usr/local/redis/src:$PATH" #设置环境变量
这一步可以参考我的上一篇博客:Redis环境搭建及Redis shell的使用
安装 redis-trib.rb 工具 redis-trib.rb 是采用Ruby实现的Redis集群管理工具。内部通过Cluster相关命令帮我们简化集群创建、检查、槽迁移和均衡等常见运维操作,使用前需要安装Ruby环境。注意由于我们用redis-trib.rb 在一台服务器上就可以操作整个集群了,所以只需要挑选一台服务器安装既可,不需要每天服务器都安装。
1)安装Ruby 1 2 3 4 5 6 7 8 9 10 [root@gdyt-wbredis01 local]# wget https://cache.ruby-lang.org/pub/ruby/2.3/ruby-2.3.1.tar.gz [root@gdyt-wbredis01 local]# tar -xf ruby-2.3.1.tar.gz [root@gdyt-wbredis01 local]# ln -s ruby-2.3.1 ruby [root@gdyt-wbredis01 local]# cd ruby [root@gdyt-wbredis01 ruby]# ./configure [root@gdyt-wbredis01 ruby]# make && make install [root@gdyt-wbredis01 ruby]# ./ruby -v ruby 2.3.1p112 (2016-04-26 revision 54768) [x86_64-linux] [root@gdyt-wbredis01 ruby]# export "PATH=/usr/local/redis/src:/usr/local/ruby:/usr/local/ruby/bin:$PATH" #设置环境变量
2)安装 rubygem redis 依赖。 1 2 3 4 [root@gdyt-wbredis01 ruby]# gem sources --add https://ruby.taobao.org/ --remove https://rubygems.org/ [root@gdyt-wbredis01 bin]# gem sources -l https://ruby.taobao.org/ [root@gdyt-wbredis01 bin]# gem install redis
安装好后执行 redis-trib.rb 命令确认是否安装成功。
集群配置 1)创建集群配置文件夹 1 #mkdir /etc/redis/redis_cluster -p
2)创建多个实例目录 1 2 3 4 5 6 7 [root@gdyt-wbredis01 redis_cluster]# mkdir 7000 7001 7002 7003 [root@gdyt-wbredis01 redis_cluster]# ls -l 总用量 16 drwxr-xr-x 2 root root 4096 8月 16 09:59 7000 drwxr-xr-x 2 root root 4096 8月 16 09:59 7001 drwxr-xr-x 2 root root 4096 8月 16 09:59 7002 drwxr-xr-x 2 root root 4096 8月 16 09:59 7003
3) 配置文件 1 2 3 4 cp /usr/local/redis/redis.conf 7000/redis.conf cp /usr/local/redis/redis.conf 7001/redis.conf cp /usr/local/redis/redis.conf 7002/redis.conf cp /usr/local/redis/redis.conf 7003/redis.conf
1 2 3 4 5 6 7 8 9 10 bind 10.2.8.94 #绑定本机IP daemonize yes #后台运行 pidfile /var/run/redis_7000.pid #PID文件 port 7000 #监听端口 cluster-enabled yes #开启集群 cluster-config-file /etc/redis/redis_cluster/7000/nodes-7000.conf #实例节点配置 cluster-node-timeout 5000 #集群通信超时 appendonly yes #AOF日志开启写 aof-rewrite-incremental-fsync yes cluster-require-full-coverage no #设置为no主节点故障时,不会影响其他节点的可用性
4)用配置文件启动各个节点 1 2 3 4 [root@gdyt-wbredis01 ~]# redis-server /etc/redis/redis_cluster/7000/redis.conf [root@gdyt-wbredis01 ~]# redis-server /etc/redis/redis_cluster/7001/redis.conf [root@gdyt-wbredis01 ~]# redis-server /etc/redis/redis_cluster/7002/redis.conf [root@gdyt-wbredis01 ~]# redis-server /etc/redis/redis_cluster/7003/redis.conf
1 2 3 4 [root@gdyt-wbredis02 ~]# redis-server /etc/redis/redis_cluster/7004/redis.conf [root@gdyt-wbredis02 ~]# redis-server /etc/redis/redis_cluster/7005/redis.conf [root@gdyt-wbredis02 ~]# redis-server /etc/redis/redis_cluster/7006/redis.conf [root@gdyt-wbredis02 ~]# redis-server /etc/redis/redis_cluster/7007/redis.conf
1 2 3 4 [root@gdyt-wbredis03 ~]# redis-server /etc/redis/redis_cluster/7008/redis.conf [root@gdyt-wbredis03 ~]# redis-server /etc/redis/redis_cluster/7009/redis.conf [root@gdyt-wbredis03 ~]# redis-server /etc/redis/redis_cluster/7010/redis.conf [root@gdyt-wbredis03 ~]# redis-server /etc/redis/redis_cluster/7011/redis.conf
5)配置集群(At least 6 nodes are required., 至少需要6个节点) 1 [root@gdyt-wbredis01 ~]#redis-trib.rb create --replicas 1 10.2.8.94:7000 10.2.8.94:7001 10.2.8.94:7002 10.2.8.94:7003 10.2.8.95:7004 10.2.8.95:7005 10.2.8.95:7006 10.2.8.95:7007 10.2.8.96:7008 10.2.8.96:7009 10.2.8.96:7010 10.2.8.96:7011
其中 –replicas 后面的 数字 表示给每个主节点配备几个从节点,这里需要特别注意的是,redis-trib.rb会重新排序列表顺序,来确定主从角色,尽可能的保证主从节点不分配在统一机器下。
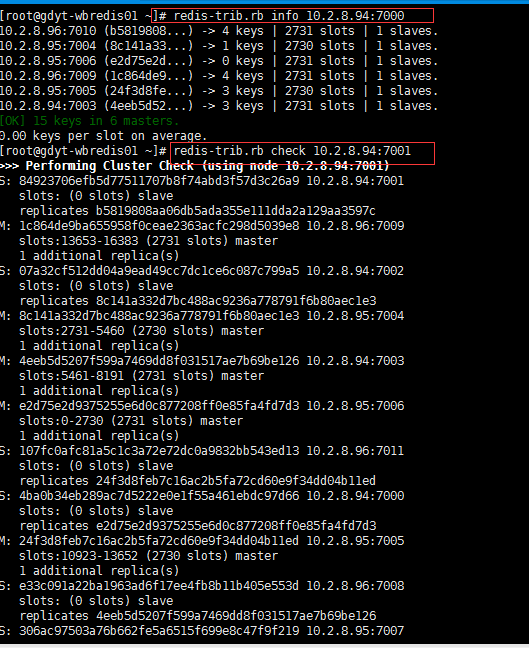
可以用 redis-trib.rb 的 info 或 check 来查看或检查集群的信息
1 2 3 4 5 6 7 8 9 10 11 12 13 14 15 16 17 18 19 20 21 22 23 24 25 26 27 28 29 30 31 32 33 34 35 36 37 38 39 40 41 42 [root@gdyt-wbredis01 ~]# redis-trib.rb check 10.2.8.94:7001 >>> Performing Cluster Check (using node 10.2.8.94:7001) S: 84923706efb5d77511707b8f74abd3f57d3c26a9 10.2.8.94:7001 slots: (0 slots) slave replicates b5819808aa06db5ada355e111dda2a129aa3597c M: 1c864de9ba655958f0ceae2363acfc298d5039e8 10.2.8.96:7009 slots:13653-16383 (2731 slots) master 1 additional replica(s) S: 07a32cf512dd04a9ead49cc7dc1ce6c087c799a5 10.2.8.94:7002 slots: (0 slots) slave replicates 8c141a332d7bc488ac9236a778791f6b80aec1e3 M: 8c141a332d7bc488ac9236a778791f6b80aec1e3 10.2.8.95:7004 slots:2731-5460 (2730 slots) master 1 additional replica(s) M: 4eeb5d5207f599a7469dd8f031517ae7b69be126 10.2.8.94:7003 slots:5461-8191 (2731 slots) master 1 additional replica(s) M: e2d75e2d9375255e6d0c877208ff0e85fa4fd7d3 10.2.8.95:7006 slots:0-2730 (2731 slots) master 1 additional replica(s) S: 107fc0afc81a5c1c3a72e72dc0a9832bb543ed13 10.2.8.96:7011 slots: (0 slots) slave replicates 24f3d8feb7c16ac2b5fa72cd60e9f34dd04b11ed S: 4ba0b34eb289ac7d5222e0e1f55a461ebdc97d66 10.2.8.94:7000 slots: (0 slots) slave replicates e2d75e2d9375255e6d0c877208ff0e85fa4fd7d3 M: 24f3d8feb7c16ac2b5fa72cd60e9f34dd04b11ed 10.2.8.95:7005 slots:10923-13652 (2730 slots) master 1 additional replica(s) S: e33c091a22ba1963ad6f17ee4fb8b11b405e553d 10.2.8.96:7008 slots: (0 slots) slave replicates 4eeb5d5207f599a7469dd8f031517ae7b69be126 S: 306ac97503a76b662fe5a6515f699e8c47f9f219 10.2.8.95:7007 slots: (0 slots) slave replicates 1c864de9ba655958f0ceae2363acfc298d5039e8 M: b5819808aa06db5ada355e111dda2a129aa3597c 10.2.8.96:7010 slots:8192-10922 (2731 slots) master 1 additional replica(s) [OK] All nodes agree about slots configuration. >>> Check for open slots... >>> Check slots coverage... [OK] All 16384 slots covered.
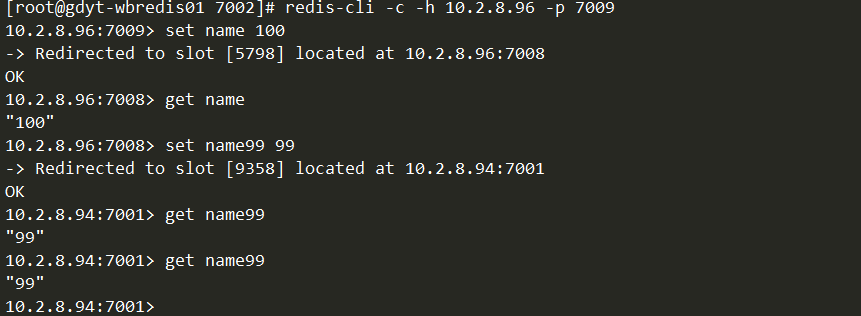
6)验证 通过 -c 参数进入集群模式进行验证后, 在任意一台服务器连接任意实例端口操作数据,将会自动在片区进行操作。
至此,整个集群已经配置完成了。
三、设置密码 vi /etc/redis/redis_cluster/7000/redis.conf
在文件末尾加入。
1 2 masterauth "crazyfzw" requirepass "crazyfzw"
按照同样的方法给集群的所有节点设置相同的密码(一定要相同),然后通过配置文件重新启动所有服务就可以了。
设置密码后的注意事项:
需要注意的是设置密码后,执行 redis-cli 连接的时候需要一定要指定密码,否则无法执行任何命令,会报错(error) NOAUTH Authentication required.,如下图:
正确的操作应该这样:
1 redis-cli -c -h 10.2.8.94 -p 7000 -a yourpass
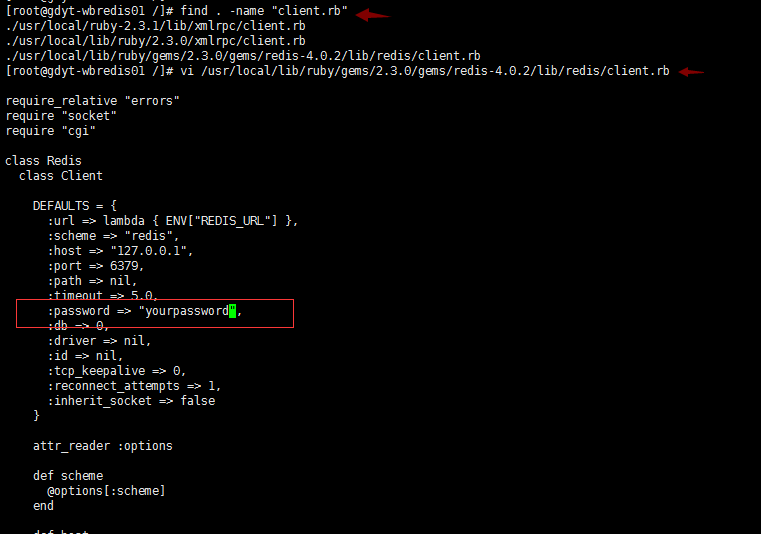
*设置密码后 redis-trib.rb 工具将会无法使用,执行相关命令会报错: *
解决办法:修改 client.rb 的中的密码。(tip: 可以通过find命令找到文件所在的目录)
四、优化系统 1 2 3 4 5 6 vi /etc/sysctl.conf #TCP监听队列值 net.core.somaxconn = 2048 #内存分配策略,选择1 表示内核允许分配所有的物理内存,而不管当前的内存状态如何; #默认0 表示内核将检查是否有足够的可用内存供应用进程使用;如果有足够的可用内存,内存申请允许;否则,内存申请失败,并把错误返回给应用进程 vm.overcommit_memory = 1
1 2 3 4 5 #Redis不使用透明大页 #加入开机启动 # vi /etc/rc.local echo never > /sys/kernel/mm/transparent_hugepage/enabled ``
五、创建方便运维的脚本 一般我们出于对成本的考虑,我们会在一台服务器上装几个节点, 所以一旦集群出现故障,需要重启时,需要分别执行命令去启动几个节点。
1 2 3 4 [root@gdyt-wbredis01 ~]# redis-server /etc/redis/redis_cluster/7000/redis.conf [root@gdyt-wbredis01 ~]# redis-server /etc/redis/redis_cluster/7001/redis.conf [root@gdyt-wbredis01 ~]# redis-server /etc/redis/redis_cluster/7002/redis.conf [root@gdyt-wbredis01 ~]# redis-server /etc/redis/redis_cluster/7003/redis.conf
特别是生产故障时,这种做法非常不方便,所以可以自己写个 shell 脚本,
编写脚本
1 2 3 4 5 6 7 8 9 10 11 12 13 14 15 16 17 18 19 20 21 22 23 24 25 26 27 28 29 30 31 32 33 34 35 36 37 38 39 40 41 42 43 44 45 46 47 48 49 50 51 52 53 54 55 56 57 58 59 60 61 62 63 64 65 66 67 68 69 70 71 72 73 74 75 76 77 78 79 # !/bin/bash # chkconfig: 2345 55 25 # description: Redis实例集群服务启动和停止脚本 # 公共参数 REDIS_BIN="/usr/local/redis/src/" LOCAL_IP=`ip addr | grep "inet" | grep -v "inet6" | awk -F ' ' '{print $2}' | awk -F '/' '{print $1}' | grep -v "127.0.0.1"` #如果IP有多个,需要指定IP PORT_LIST="7000 7001 7002 7003" #端口需要根据实际情况定义,每个端口使用空格隔开 CONFIG_DIR="/etc/redis/redis_cluster" PASSWORD="yourpassword" for port in $PORT_LIST do if [ ! -f "$CONFIG_DIR/$port/redis.conf" ] then echo "$CONFIG_DIR/$port/redis.conf is not exist!" exit 2 fi done export PATH=$REDIS_BIN:$PATH function status(){ for port in $PORT_LIST do pid=`ps aux | grep -v grep | grep "redis-server $LOCAL_IP:$port" | awk -F ' ' '{print $2}'` if [ ! -z "$pid" ] then echo "redis process [$pid] $LOCAL_IP:$port is run.." else echo "redis process [$pid] $LOCAL_IP:$port not run.." fi done } function start(){ for port in $PORT_LIST do redis-server $CONFIG_DIR/$port/redis.conf done status } function stop(){ for port in $PORT_LIST do redis-cli -h $LOCAL_IP -p $port -a $PASSWORD shutdown done status } case "$1" in start) echo "start redis.." start ;; stop) echo "stop redis.." stop ;; status) echo "redis status.." status ;; restart) echo "restart redis.." echo "stop redis.." stop echo "start redis.." start ;; *) echo $"Usage: $0 {start|stop|status|restart}" exit 2 esac
注册服务,并设置成开机启动
1
2
3
4
[root@gdyt-wbredis01 init.d]# ls -l /etc/init.d/redis-server -rwxr-xr-x 1 root root 1506 8月 17 09:47 /etc/init.d/redis-server [root@gdyt-wbredis01 init.d]# chkconfig --add redis-server [root@gdyt-wbredis01 init.d]# chkconfig on redis-server
使用脚本进行启动,停止,重启 redis 服务
1 2 3 4 # /etc/init.d/redis-server start #启动 # /etc/init.d/redis-server status #状态 # /etc/init.d/redis-server stop #停止 # /etc/init.d/redis-server restart #重启